Categories
Trade Copier
Getting started with the WealthCharts Trade Copier
First, to locate the Trade Copier, select the Main Menu icon in the top-left corner of the platform. From there, navigate to the Trading category and select the Trade Copier tile. You may also use the search bar within the Main Menu to find it directly.
To use the Trade Copier, you must have an active WealthCharts account and an account with a partnered Prop Firm. Once opened, ensure that Trade Copying is enabled by clicking the red Trade Copying icon at the top of the platform. Please note that Trade Copying is session-based, meaning it must be enabled again if you open WealthCharts in a new browser tab or window.
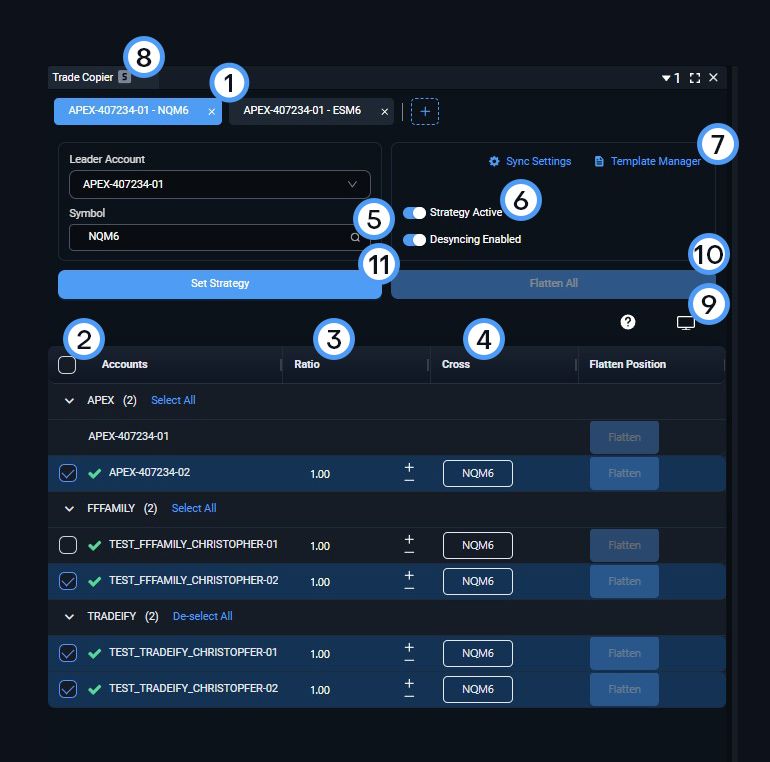
1. Copier Strategies
Rather than loading multiple components, the Trade Copier allows you to create and manage multiple strategies within a single component. Each green strategy box represents a unique copier strategy that can be customized with:
- A unique instrument or symbol
- A selected group of follower accounts
- Individual Ratio and Cross settings
Duplicate symbols are not allowed across strategies. If a symbol is already in use in one strategy, it cannot be used in another.
When creating a new strategy, select the desired symbol and click the blue Set Strategy button to apply it. Going forward, certain settings will apply automatically; however, strategies that require confirmation via Set Strategy must be applied before they take effect across browser tabs. If a change requires pressing the Set Strategy button to save, the button will appear highlighted in blue and be pressable.
2. Account Checkboxes
To begin copying trades, the checkboxes next to each account must be selected. Any checked account that was saved will receive copied trades from the leader account. A follower account different from the leader account must be selected in order for copying to occur. To save the selected follower accounts, click the blue Set Strategy button whenever it is active. Consistently doing so ensures your strategies are properly applied.
3. Ratio
Ratio multiplies the amount of contracts that you are entering through the DOM or order panel for that account. Change the value in this field by using the plus and minus icons or simply edit the Ratio value by entering a number manually. To save the selected ratio value, click the blue Set Strategy button whenever it is active. Consistently doing so ensures your strategies are properly applied.
4. Cross
When Cross is enabled, trades will be placed in the opposing market type.
For example:
- A trade placed as ESH6 will be copied as a Micro contract, MESH6, in accounts where Cross is enabled.
This column will display blue buttons indicating the active symbol. Clicking these buttons allows you to switch between the primary and opposing market symbols.
5. Instrument / Symbol Search
Enter the instrument you wish to copy trades for. This field is required before trades can be copied.
If a non-tradable symbol is entered, an error message will appear. Please ensure that the selected symbol is valid and tradable with your chosen Prop Firm.
6. Instance Enable / Disable Toggle & Syncing / Desyncing
Each strategy includes an Instance Enabled / Disabled toggle.
- When enabled, trades will be copied for that strategy.
- When disabled, trades will not be copied for that strategy.
This allows you to temporarily pause individual strategies without deleting them.
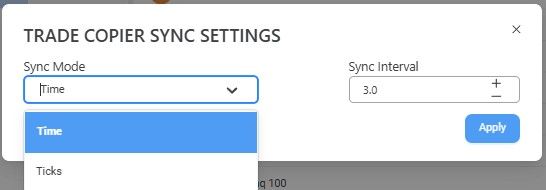
Gear Icon: determines how you want your follower accounts to sync compared to the leader account. You can select to go by Time or by Ticks, with Time selected, your follower accounts will have a certain amount of seconds (the value present within the Sync Interval field) to fill/mimic the leader account. If the allotted amount of time passes before the follower account(s) are able to fill/mimic the leader account, the account(s) will be deemed as "Desynced" and will flatten out of the copied position.
7. Template Manager
All valid Trade Copier configurations can be saved as Templates.
- Save multiple templates for different instruments or strategy setups, allowing you to quickly load them and switch strategies as needed.
When a template is applied, text above the button will display the template name along with the word “Applied”. Within the Template Manager, you can rename, modify, or delete existing templates.
8. Symbol Linking Behavior
When the Trade Copier is linked to a chart:
- Changing the symbol on the chart will not change the symbol in the Trade Copier.
- Changing the symbol within the Trade Copier, or switching to a different strategy, will update the linked chart to match the selected symbol.
This behavior is intentional and prevents unintended changes to copier strategies while analyzing charts.
9. Tour Guide
Click the Tour Guide icon to launch a step-by-step walkthrough highlighting the most important Trade Copier features and setup steps.
10. Flatten Positions
Need to exit positions quickly? Use the Flatten All button to close all open positions for the instrument associated with that copier strategy.
You can also flatten positions for individual accounts by clicking the Flatten button next to the corresponding account.
Please note that flattening the leader account will also result in all following accounts being flattened.
11. Set Strategy (The last, and most important step)
The Set Strategy button is used to confirm and apply certain strategy-level changes.
- When creating a new strategy, Set Strategy must be clicked after selecting a symbol for the strategy to become active.
- Some settings apply automatically, but changes that require confirmation will cause the Set Strategy button to turn blue, indicating action is required.
- Until Set Strategy is pressed, those changes will not be fully applied across browser tabs or sessions.
As a best practice, if the Set Strategy button is blue, click it to ensure your strategy changes are saved and applied correctly.