Categories
About UsHow to get startedAccount AccessBreakeven Stops, Manual Stops, and Trailing Stops
Ready to take your risk management to the next level? Watch the video or article below to create your own Breakeven, Manual, and Trailing Stops!
Prerequisites
To access advanced stop features, make sure you're using an Advanced Order Type, available at the bottom of your order panel as seen on the screenshot above:
• Simple Bracket
• Multi Bracket
These order types allow you to set up automatic stop-loss and take-profit conditions.
Trailing Stops
What is a Trailing Stop?
A trailing stop is a stop-loss that automatically moves with the price when the trade goes in your favor. However, it remains fixed if the price starts moving against you. This helps lock in profits while still giving the trade room to breathe.
How to Set Up a Trailing Stop
1. Start with a bracket order that includes a stop-loss.
2. You may disable the take-profit if you want to focus only on the stop.
3. Set your initial Stop Loss (for example, 30 ticks below your entry price).
4. Define a trailing trigger - this is how far the trade must move in your favor before the stop begins to trail.
5. Trail After Trigger (Optional) – This is the amount your stop will trail by once the trigger price is reached. If left at 0, the stop will trail using the initial stop loss value.
Example:
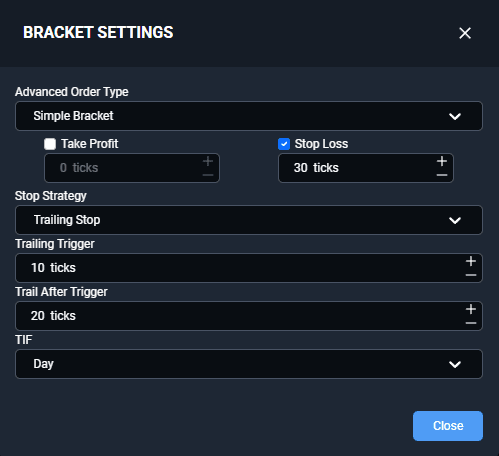
• Entry: Long position
• Stop-loss: 30 ticks below entry
• Trailing Trigger: 10 ticks
• Trail After Trigger: 20 ticks
Once the trade moves up 10 ticks, the stop will begin trailing 20 ticks behind the highest price reached.
Immediate Trailing Option
If you want the stop to start trailing immediately after you enter the trade:
• Set the trailing trigger to zero.
This means the stop will follow the market from the very beginning, maintaining the same set distance behind the highest (or lowest) price reached.
If you want the stop to trail by the original stop loss value (30 ticks in this example)
• Set Trail After Trigger to 0 or 30.
Note: The trailing stop only adjusts when the price moves in your favor. It does not tighten if the price retraces.
Breakeven Stops
What is a Breakeven Stop?
A breakeven stop moves your stop-loss to your entry price (or slightly above or below it) once the trade moves a certain amount in your favor. This helps ensure you don’t take a loss if the trade reverses.
How to Set Up a Breakeven Stop
1. In your advanced order setup, select Breakeven Stop under Stop Strategy.
2. Set two values:
Breakeven Trigger: How far the trade must move in your favor before the stop moves.
Offset: How many ticks above (for long trades) or below (for short trades) the entry price the stop should be placed.
Example:
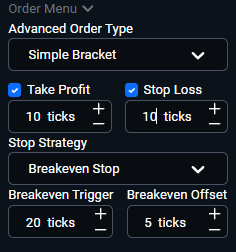
• Breakeven Trigger: 20 ticks
• Offset: 5 ticks
Once the trade moves 20 ticks in your favor, the stop will move to 5 ticks above your entry price.
This approach allows you to lock in a small profit or cover fees and commissions.
Tip: If you set the breakeven trigger too low (e.g., 0 ticks), and the market isn’t moving, your trade may close immediately due to the stop activating right away.
Manual Adjustments
After the stop has been placed, you can manually adjust it by:
• Dragging it directly on the chart.
• Modifying it within the Trading DOM (Depth of Market) interface.
This allows you to:
• Tighten the stop manually as your trade becomes more profitable.
• React to changing market conditions without removing your automated setup.
Static or “Flat” Stop-Loss
What is a Static Stop?
A static stop (also referred to as a “nonstop strategy”) is a fixed stop-loss placed a specific number of ticks away from your entry. It doesn’t move unless you move it manually.
When to Use a Static Stop
Static stops are useful in:
• Highly volatile markets, to immediately protect your downside.
• Simpler trading strategies where you don’t want automation.
• Scenarios where you plan to actively monitor and manage the trade.
You can still drag and adjust a static stop during the trade as needed.
Using these tools effectively can help you protect trades, manage risk, and let profits run when the market moves in your favor. It may be best to test and practice with small positions or paper trading until you're confident in how each stop behaves.
Review related articles below on how to get started with Simple and Multi-bracket orders!